第10讲:JavaScript基于window对象的应用(二)
10.1 窗口的定位
语法:
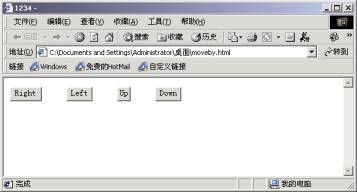
n window.moveBy(x,y),该语句每执行一次就会向指定的方向移动指定的距离。
n window.moveTo(x,y),执行该语句窗口将向目标坐标(x,y)移动。
注意:window.moveBy(x,y)中的(x,y)表示窗口移动的纵横距离,而window.moveTo(x,y)中的(x,y)表示窗口移动到的目标坐标,上述window对象的两种方法其应用示例分别见〔示例一〕中的window.moveBy(x,y)示例和window.moveTo(x,y)示例。
〔示例一〕
window.moveBy(x,y)示例
<html>
<head>
<title>1234</title>
<script language="javascript">
<!--
function moveright()
{
window.moveBy(20,0);
}
//================================
function moveleft()
{
window.moveBy(-20,0);
}
//================================
function moveup()
{
window.moveBy(0,-20);
}
//================================
function movedown()
{
window.moveBy(0,20);
}
//-->
</script>
</head>
<body>
<form name="form">
<input type="button" value="Right" onclick="moveright()">
<input type="button" value="Left" onclick="moveleft()">
<input type="button" value="Up" onclick="moveup()">
<input type="button" value="Down" onclick="movedown()">
</form>
</body>
</html>
window.moveTo(x,y)示例
<html>
<head>
<title>1234</title>
<script language="javascript">
<!--
function moveright()
{
window.moveTo(400,0);
}
//================================
function moveleft()
{
window.moveTo(0,0);
}
//================================
function moveup()
{
window.moveTo(400,300);
}
//================================
function movedown()
{
window.moveTo(0,300);
}
//-->
</script>
</head>
<body>
<form name="form">
<input type="button" value="Right" onclick="moveright()">
<input type="button" value="Left" onclick="moveleft()">
<input type="button" value="Up" onclick="moveup()">
<input type="button" value="Down" onclick="movedown()">
</form>
</body>
</html>
注意:上述代码的图示与图10-1基本一致,只是移动窗口时的方式不一样。
10.2 窗口大小的控制
语法:
n window.resizeBy(x,y)(x表示窗口水平方向的改变量,其值若为正,则表示窗口将在水平方向放大,反之则会缩小;y表示窗口竖直方向的改变量,其值若为正,则表示窗口将在竖直方向放大,反之则会缩小,window.resizeBy(x,y)的具体见〔示例二〕的“window.resizeBy(x,y)示例”。)
n window.resizeTo(x,y)(该方法可直接设定窗口的大小,其中x表示窗口的宽度,y表示窗口的高度。)
〔示例二〕
window.resizeBy(x,y)示例
<html>
<head>
<title>1234</title>
<script language="javascript">
<!--
function moveright()
{
window.resizeBy(20,0);
}
//================================
function moveleft()
{
window.resizeBy(-20,0);
}
//================================
function moveup()
{
window.resizeBy(0,20);
}
//================================
function movedown()
{
window.resizeBy(0,-20);
}
//-->
</script>
</head>
<body>
<form name="form">
<input type="button" value="Right" onclick="moveright()">
<input type="button" value="Left" onclick="moveleft()">
<input type="button" value="Up" onclick="moveup()">
<input type="button" value="Down" onclick="movedown()">
</form>
</body>
</html>
注意:上述代码的图示与图10-1基本一致,只是移动窗口时的方式不一样。
window.resizeTo(x,y)示例
<html>
<head>
<title>1234</title>
<script language="javascript">
<!--
function moveright()
{
window.resizeTo(640,480);
}
//================================
function moveleft()
{
window.resizeTo(320,240);
}
//================================
function moveup()
{
window.resizeTo(1024,768);
}
//================================
function movedown()
{
window.resizeTo(800,600);
}
//-->
</script>
</head>
<body>
<form name="form">
<input type="button" value="640*480" onclick="moveright()">
<input type="button" value="320*240" onclick="moveleft()">
<input type="button" value="1024*768" onclick="moveup()">
<input type="button" value="800*600" onclick="movedown()">
</form>
</body>
</html>
图10-2 窗口大小的调整示例
10.3 限制窗口大小的变化
〔示例三〕
<html><head><title>1234...</title>
<script language="javascript">
<!--
function enabled()
{
//alert("为了保证页面的显示效果,请不要随意控制该窗口的尺寸!");
window.resizeTo(400,300);
}
window.resizeTo(400,300);
//-->
</script>
</head>
<body onresize="enabled()">
</body></html>
图10-3 限制窗口大小的变化示例
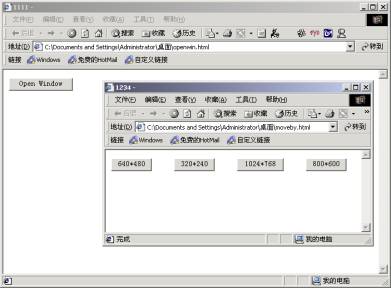
10.4 利用window.open()方法新开窗口
语法:window.open(“url”,name,parameters),其参数解释如下:
n url(新开窗口的指定路径,若url为空,则表示新开一个空白窗口)
n name(新开窗口的名称)
n parameters(新开窗口的显示格式,如有无浏览器的菜单栏等)
〔示例四〕
<html>
<head>
<title>1111</title>
<script language="javascript">
<!--
function openwin()
{
window.open("moveby.html");
}
//-->
</script>
</head>
<body>
<form>
<input type="button" value="Open Window" onclick="openwin()">
</form>
<body>
</html>
图10-4 新开窗口应用示例
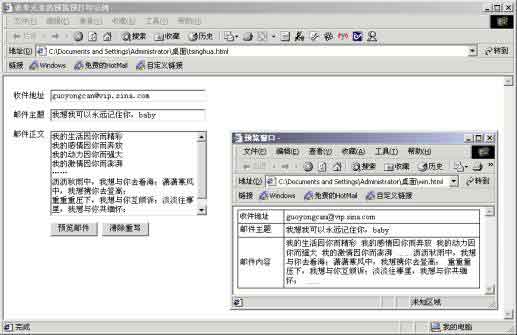
10.5 表单元素内容的预览预
〔示例四〕
<html>
<head>
<title>表单元素的预览预打印示例</title>
<script language="javascript">
<!--
function viewmail()
{
var newwin=window.open("win.html");
newwin.document.write("<html><head><title>预览窗口</title></head>");
newwin.document.write("<body leftmargin=0 topmargin=5>");
newwin.document.write("<table width=400 border=0 align=center cellpadding=3 cellspacing=1 bgcolor=#000000>");
newwin.document.write("<tr bgcolor=#FFFFFF>");
newwin.document.write("<td width=69><font size=2>收件地址</font></td>");
newwin.document.write("<td width=316><font size=2>",document.form.mailaddress.value,"</font></td>");
newwin.document.write("</tr>");
newwin.document.write("<tr bgcolor=#FFFFFF>");
newwin.document.write("<td><font size=2>邮件主题</font></td>");
newwin.document.write("<td><font size=2>",document.form.mailsubject.value,"</font></td>");
newwin.document.write("</tr>");
newwin.document.write("<tr bgcolor=#FFFFFF>");
newwin.document.write("<td><font size=2>邮件内容</font></td>");
newwin.document.write("<td><font size=2>",document.form.mailcontent.value,"</font></td>");
newwin.document.write("</tr>");
newwin.document.write("</table>");
}
//-->
</script>
</head>
<body>
<form name="form">
<table width="400" border="0" cellspacing="3" cellpadding="3">
<tr>
<td width="52"><font size="2">收件地址</font></td>
<td width="327"><font size="2">
<input name="mailaddress" type="text" size="35">
</font></td>
</tr>
<tr>
<td><font size="2">邮件主题</font></td>
<td><font size="2">
<input name="mailsubject" type="text" size="35">
</font></td>
</tr>
<tr>
<td colspan="2"><div align="center"></div></td>
</tr>
<tr>
<td valign="top"><font size="2">邮件正文</font></td>
<td><font size="2">
<textarea name="mailcontent" cols="34" rows="9"></textarea>
</font></td>
</tr>
<tr>
<td><font size="2"> </font></td>
<td><font size="2">
<input type="button" name="view" value="预览邮件" onclick="viewmail()">
<input type="reset" name="return" value="清除重写">
</font></td>
</tr>
</table></form></body></html>
图10-5 表单元素内容的预览